Sunday, 14 July 2019

Understand CTA report in netsuite


CTA – Report - Cumulative Translation Adjustment Report

The cumulative translation adjustment (CTA) for a currency translation adjustment is an entry in the “Accumulated Other Comprehensive Income” section of the translated balance sheet, reflecting gains and losses caused by exchange rate fluctuations over the years.

Understand CTA Account:
-          Cumulative Translation Adjustment (CTA) is a special type of account that is required for consolidated balance sheets in NetSuite OneWorld accounts with multi-currency enabled.

-          The CTA is used on the consolidated balance sheet to make it balance despite differing foreign exchange rate types.
-          In NetSuite it is configured as “Equity” type.
-          No Currency is defaulted.
-          General Rate Type – Historical, Cash flow Rate – Historical.

Understand the Exchange Rates from Consolidated Exchange Rates:

Average – This rate is calculated from a weighted average of the exchange rates for transactions applied during the period to accounts with a general rate type of Average.
Current – Also referred to as ending rate. This rate is based on the currency exchange rate that is effective at the end of the reported upon period.
Historical – This rate is calculated from a weighted average of the exchange rates for transactions applied during the period to accounts with a general rate type of Historical.
  • General Rate Type:
This General Rate Type uses in all in the income statement, balance sheet, and other general purposes.
    • Current - for all balance sheet accounts other than equity accounts
    • Average - for all income statement accounts
    • Historical - for all equity accounts
  • Cash Flow Rate Type:
This Cash Flow Rate Type uses in all Cash Flow statements.
    • Average - for all accounts
So, here the CTA account is “Equity” type, hence it has the General Rate Type as “Historical” and Cash Flow Rate Type as “Average”.

  
Example:
If a U.S.-based company wishes to operate in Germany, it must convert some of its U.S. dollars to euros for purposes of purchasing or renting property, paying employees, paying German taxes, etc. In addition, German citizens or businesses that work with this U.S.-based company will pay with euros. The company will create its financial statements in one currency, the dollar. It must convert the value of its business activities conducted in Germany with the euro back to dollars via an exchange rate.

Key points of CTA report in NetSuite:

1.       This report is available only for OneWorld accounts with the Multiple Currencies and Accounting features enabled. 
2.       The Financial Statements permission is required to access the report.
3.       The CTA Balance Audit report shows the contribution from individual accounts to the CTA during the selected period. 
4.       The rows in the CTA Balance Audit report follow the same order as the rows of the Balance Sheet.
5.       The CTA represents the cumulative foreign currency gain or loss resulting from the net investment in the subsidiary.

The CTA – Balance Audit Report has below columns:

1.       Starting Balance Sheet (As of <period>) – The period is the one before the period selected in the From field in the footer.
Local Balance – Balance of the ledger account till the period end (as per this last period end)
General Rate – Rate Type used to convert exchange rate
Consolidate Balance – This is equal to the Local Balance multiplied by the General Rate. The total in this column ties to the CTA amount in the Balance Sheet for the period before the one selected in the From field in the footer.

Example: if you are running CTA report for July month, then Starting Balance sheet shows till June End.
2.     Net Posting (<period>) – The period is the period or range of periods set in the From and To fields in the footer.
Local Balance: Current period balance (based on From and To fields)
Cash Flow Rate: It has the exchange rate value which converts based on CTA account configuration.  (in my account it is historical type)
General Rate: : It has the exchange rate value which converts based on CTA account configuration.  (in my account it is historical type)
Consolidated Balance – This is equal to the Local Balance multiplied by the General Rate.
Example : This has the current period balance based on the From and To Fields selected in the report.
Ending Balance Sheet (As of <period>) – The period is the one set in the To field in the footer.
o    Local Balance: this ledger has the last period ending balance + current period ledger balance.
o    General Rate: It has the exchange rate value which converts based on CTA account configuration.  (in my account it is historical type)
o    Consolidated Balance – This is equal to the Local Balance multiplied by the General Rate. The total in this column ties to the CTA amount in the Balance Sheet for the ending period in the range of periods.

CTA Analysis
o    Beginning Balance Rate Difference Contribution – This equals the Beginning Balance Translated at Ending Implied Rate minus Starting Balance Sheet Consolidated Balance.
o    Net Posting Rate Difference Contribution – This equals Net Posting Consolidated Balance minus Net Posting Consolidated Balance at Cash Flow Rate Contribution.
o    Net Posting Consolidated Balance at Cash Flow Rate Contribution – This equals Net Posting Local Balance multiplied by the Net Posting Cash Flow Rate.
o    Total CTA Contribution – Beginning Balance Rate Difference Contribution plus Net Posting Rate Difference Contribution plus Net Posting Consolidated Balance at Cash Flow Rate Contribution

To run the report – Go to Reports -> Financial -> click on CTA Balance Audit report.


I would like to give credits to NetSuite, for the wonderful documentation provided, it helped me a lot understand the report. For more information i would prefer, SuiteAnswers.

Thanks,
Ramu

Friday, 5 July 2019

How to create a custom page (form) using suitelets ?


-          ->suitelets are extensions of the SuiteScript API that allow you to build custom NetSuite pages and backend logic.

-          ->Suitelets are server-side scripts that operate in a request-response model, and are invoked by HTTP GET or POST requests to system generated URLs.
-          Using suitelets we can create custom pages like forms, assistant pages , linked pages.
Custom Page Components:
We need to know below 4 main components before we create custom NetSuite Pages:
1.       Page Type: This determines how the information should display on the screen.
2.       Object Members: these are the elements those needs to be added to the screen.
3.       Member Properties: Each member object can be modified by changing it’s properties like hiding or making mandatory.
4.       Page Layout: This controls how each of the member objects arranged on the page.

Here is an example of creating a custom netsuite form using suitelets:

I have created an employee on boarding page, where I’m capturing some information of employee and with that I’m creating employee record, and after clicking on the submit button navigating to the employee record whose employee details are captured in on boarding kit.

Below is the sample code :

/**

 * @NApiVersion 2.x
 * @NScriptType Suitelet
 * @NModuleScope SameAccount
 */
define(['N/email', 'N/record', 'N/redirect', 'N/ui/serverWidget'],
/**
 * @param {email} email
 * @param {record} record
 * @param {redirect} redirect
 * @param {serverWidget} serverWidget
 */
function(email, record, redirect, serverWidget) {
   
    /**
     * Definition of the Suitelet script trigger point.
     *
     * @param {Object} context
     * @param {ServerRequest} context.request - Encapsulation of the incoming request
     * @param {ServerResponse} context.response - Encapsulation of the Suitelet response
     * @Since 2015.2
     */
    function onRequest(context) {
   
    var request = context.request;
    var response  = context.response;
   
    if (request.method == 'GET'  ) {
   
    // title of the page
        var form = serverWidget.createForm ({
       
        title : 'Employee On-Boarding'
        });
       
        // field Groups in the page
        var empInfo = form.addFieldGroup ({
       
        id : 'custpage_empinfo',
        label : 'Employee Information'
       
        });
       
        var meetwSup =  form.addFieldGroup ({
       
        id : 'custpage_meetwsup',
        label : 'Meeting with Supervisor'
       
        });
       
        var welEmail = form.addFieldGroup ({
       
        id : 'custpage_wecmem',
        label : 'Welcome Email',
       
        });
       
        var firstName = form.addField({
       
        id : 'custpage_firstname',
        label : 'First Name',
        type : serverWidget.FieldType.TEXT,
        container : 'custpage_empinfo'
       
        });
       
        firstName.isMandatory = true;
       
        var midlName = form.addField({
       
        id : 'custpage_middlename',
        label : 'Middle Name',
        type : serverWidget.FieldType.TEXT,
        container : 'custpage_empinfo'
       
        });
       
        var lastName = form.addField({
       
        id : 'custpage_lastname',
        label : 'Last Name',
        type : serverWidget.FieldType.TEXT,
        container : 'custpage_empinfo'
       
        });
       
        lastName.isMandatory = true;
       
        var email = form.addField({
       
        id : 'custpage_email',
        label : 'Email',
        type : serverWidget.FieldType.EMAIL,
        container : 'custpage_empinfo'
       
        });
        
        var supervisor = form.addField({
       
        id : 'custpage_supervisor',
        label : 'Supervisor',
        type : serverWidget.FieldType.SELECT,
        container : 'custpage_empinfo',
        source : 'employee'
       
        });
       
        supervisor.isMandatory = true;
       
        var subs = form.addField({
       
        id : 'custpage_subsidiary',
        label : 'Subsidiary',
        type : serverWidget.FieldType.SELECT,
        source : 'subsidiary',
        container : 'custpage_empinfo'
       
        });
       
        subs.isMandatory = true;
       
        var fldTitle = form.addField({
       
        id : 'custpage_title',
        label : 'Title',
        type : serverWidget.FieldType.TEXT,
        container : 'custpage_meetwsup'
       
        });
       
       
        fldTitle.isMandatory = true;
       
        var fldMessage = form.addField({
       
        id : 'custpage_message',
        label : 'Message',
        type : serverWidget.FieldType.TEXTAREA,
        container : 'custpage_meetwsup'
       
        });
       
        fldMessage.isMandatory = true;
       
        var fldWelTitle = form.addField({
       
        id : 'custpage_weltitle',
        label : 'Title',
        type : serverWidget.FieldType.TEXT,
        container : 'custpage_wecmem'
       
        });
       
        fldWelTitle.isMandatory = true;
       
        var fldWelMessage = form.addField({
       
        id : 'custpage_welmessage',
        label : 'Message',
        type : serverWidget.FieldType.TEXTAREA,
        container : 'custpage_wecmem'
       
        });
       
        fldWelMessage.isMandatory = true;
       
        // update the page layout
        firstName.updateBreakType({
        breakType : serverWidget.FieldBreakType.STARTCOL
        });
       
        midlName.updateBreakType({
        breakType : serverWidget.FieldBreakType.STARTROW
        });
       
        lastName.updateBreakType({
        breakType : serverWidget.FieldBreakType.STARTROW
    });
       
//update the field display type
        midlName.updateDisplaySize({
        height : 0,
        width : 10
        });
       
        fldMessage.updateDisplaySize({
        height : 12,
        width : 60
        });
       
        fldWelMessage.updateDisplaySize({
        height : 12,
        width : 60
        });
           
        email.updateBreakType({
        breakType : serverWidget.FieldBreakType.STARTCOL
        });
       

        fldTitle.defaultValue = 'Welcome meeting with your Supervisor';
        fldMessage.defaultValue = 'Meet and Greet your supervisor and Team';
       
        fldWelTitle.defaultValue = 'Welcome to smartERP!';
        fldWelMessage.defaultValue = "Hi,"+'\n'+'\n'+"We'd like to welcome you to smartERP. Please feel to reachout us to any questions."+'\n'+'\n'+'Best Regards,'+'\n'+'smartERP HR';

        var button = form.addSubmitButton({
        label : 'Process Employee Details'
        });
       
        context.response.writePage(form);
    } else { // POST method
    // get the field details and store on variables
    var fName = request.parameters.custpage_firstname;
    var mName = request.parameters.custpage_middlename;
    var lName = request.parameters.custpage_lastname;
    var empEmail = request.parameters.custpage_email;
    var sprvsr = request.parameters.custpage_supervisor;
    var subs = request.parameters.custpage_subsidiary;
   
// Create the employee record using the above parameters
    var employeeObj = record.create({
   
    type : record.Type.EMPLOYEE,
    isDynamic : true,
   
    });
   
    employeeObj.setValue('firstname', fName);
    employeeObj.setValue('lastname', lName);
    employeeObj.setValue('email', empEmail);
    employeeObj.setValue('supervisor', sprvsr);
    employeeObj.setValue('subsidiary', subs);
   
// save the employee record
    var empID = employeeObj.save();
   
//go to the employee record which is created.
    redirect.toRecord ({
   
    type : record.Type.EMPLOYEE,
    id   : empID,
    isEditMode : true
    });
    }
   
    }

    return {
        onRequest: onRequest
    };
    
});

Before Submitting :
:


Friday, 21 June 2019

How will you disable line item field without disabling entire column using CLient Script (SuiteScript 2.0)?

Here I came across one of the scenario, like i need to disable a line item field depends upon a condition. So, while doing this change in Client Script, complete column was disabled instead on a single field in a row.

I have used "field.Disabled=true" for disabling the field.

In-fact, as per the Suite Script 2.0 API, documentation provides the definition provides like this:

If you are working with a sublist field, you can set this property to true or  false, but
be aware that this action affects the entire sublist column, even though a sublist field is
associated with one line. 
¦ For both body and sublist fields, you can use Field.isDisabled to determine whether
the field is disabled or enabled.


To overcome the above issue i have followed below steps:

1. Created a client script, under the "lineinit(context)" section, added below lines of Code:

function lineInit(context) {
   
    var invoice = context.currentRecord;

    var selectedLine = invoice.getCurrentSublistIndex({
    sublistId: 'item'
    });
   
    var qty = invoice.getCurrentSublistValue({
   
    sublistId: 'item',
    fieldId : 'quantity',
 

    });
 
    if (qty > 1.0) {
   
    invoice.getSublistField({
   
    sublistId : 'item',
    fieldId: 'description',
    line:0
    }).isDisabled = true;
    }
    else {
   
    invoice.getSublistField({
   
    sublistId : 'item',
    fieldId: 'description',
    line:0
    }).isDisabled = false;
   
    }

    }

Here I have considered "line" number as "0", line is a mandatory option in the .getSublistField() method. The main use of lineinit is, the code is executed when an existing line is selected. Since the code is executed at line level, so everyline will hold line number as 0.


In the above line the Description field is disabled the the item quantity has crossed more than 1.

Note: this will work absolutely fine in SuiteScript1.0 without any line number. below is the method need to be used.
nlapiDisableLineItemField(type, fldnam, val)

Thanks


Sunday, 16 June 2019

How do you create Radio buttons in NetSuite ?

As per my knowledge we cannot create a radio field using Suite Customization, like Creating Custom Field, Creating a radio button using workflow is not available.

To Overcome that we can use SuiteScript.  We can create the RADIO button field using the "N/ui/ServerWidget" Module.

Follow below steps to create a radio button in NS:

1. Load the "N/ui/ServerWidget" in server side script, like UserEvet or Suitelet depends upon the requirement,

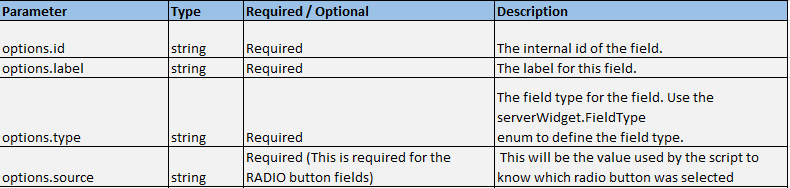
2. Use "form.addField(options)" to add a field,

Below are the options , which needs to be used:


// Create Radio button for undeposited
        var field2 = context.form.addField({
        id: 'custpage_radiofield',
        type: serverWidget.FieldType.RADIO,
        label: 'Undep.Funds',
        source: 'undepfunds'
        });

/ Create Radio button To select Account
        var field3 = context.form.addField({
        id: 'custpage_radiofield',
        type: serverWidget.FieldType.RADIO,
        label: 'Account',
        source: 'selectaccount'
        });

Use field.setHelpText(options) to set the help text in the fields.

field2.setHelpText({
       
        help : "Select Undeposited Account",
        showInlineForAssistbaonotlean: true
       
        });

 In Radio buttons, the 'id' will be always same, we must have source as unique, we must use source to select the radio buttons.

like  below:

 if (record.getValue('custpage_radiofield') == 'undepfunds' ) {

<< Do something>>

 }

 if (record.getValue('custpage_radiofield') == 'selectaccount' ) {

<< Do something>>

 }

Please go through suitescript 2.0 API document if you need more information.

Thanks


Saturday, 15 June 2019

How do you overcome "RangeError:maximum stack size exceeded" error while changing the field in NS page ?

Here I  came across one issue:

I was trying to select a radio button from NetSuite UI, during the change i'm trying to insert an account in client script, and trying to fetch from the list of accounts in UserEvent script,  this happens on the field change so, my client script has triggered recursively hence I have received "RangeError:maximum stack size exceeded" error on my custom page created in NS.
Now, how i have avoided this issue is :

in Client Script, in fieldChanged(context) section:

Apply highlighted line of code:

currentRecord.setValue({fieldId:'custrecord_account', value: acct,  ignoreFieldChange:true});

This way we can solve the maximum stack size errors. There might be many scenario's, but i suggest use ignoreFieldChange:true to solve these kind of issues.


Thanks,
Ram

Tuesday, 11 June 2019

How to Hide the Buttons in a NetSuite Page ?


Before proceeding, i want to thank Marty Zigman, and his blog http://blog.prolecto.com.
I got the best help from his blog which helped me to overcome the hiding buttons issue. 

With Suite Flow  (Point and click Customization's)  we cannot hide/remove buttons in the NetSuite page.

Like in Prospect page -> if i need to hide "New Contact", "Attach", "Update Primary", "Customize View" buttons what should I do?

Since with NS Point and Click functionality doesn't support us to hide these buttons, we can use Client side JavaScript to get the control. this kind of programming is called "Document Object Model (DOM)".

Before implementing, we should know below steps:


  1. JQuery: NetSuite provides a reference to the JQuery add-in library by default. Thus it is convenient for DOM operations.
  2. HTML IDs: We need to know the IDs of the target HTML elements we want to manipulate.
  3. Script: We need to inject some client-side JavaScript into the HTML to get ultimate control.
I have followed below approach to hide the buttons in NS:

1. Since i need to hide the buttons in both "View" mode and "Edit" mode, hence I have used "UserEvent Script".

2. Hover on "New Contact" button -> Right Click -> Inspect -> click on it.

3. Verify the "id" for the "New Contact" button in "<input>".
As per below screen:

My Requirement is :

In Prospect record, under "Relationship" subtab:

1. Hide "New Customer", "Attach", "Update Primary" buttons,
2. Role Field

Scripting:

For that, I have chosen below way:

1. Considered UserEvent Script.
2. Creating an "Inline Text Field" and pushing the jQuery into this field.

//create an inline html field
    var hideField = context.form.addField({
    id:'custpage_hide_fields',
    label:'Hidden',
    type: serverWidget.FieldType.INLINEHTML
     });

var src = "";

    // hiding Role field in edit mode
    src += 'jQuery("#inpt_contactrole10").hide();';
    src += 'jQuery("#inpt_contactrole10_arrow").hide();';
   
        //hiding buttons
        src += 'jQuery("#newcontact").hide();';
    src += 'jQuery("#addcontact").hide();';
    src += 'jQuery("#updatecontact").hide();';
    src += 'jQuery("#tbl_newcontact").hide();';
    src += 'jQuery("#tbl_addcontact").hide();';
    src += 'jQuery("#tbl_updatecontact").hide();';

        //hiding Role Field in view mode
        src += 'jQuery("#contact_contactrole_fs_lbl_uir_label").hide();';
    src += 'jQuery("#inpt_contactrole1").hide();';
    src += 'jQuery("#inpt_contactrole1_arrow").hide();';
   
    log.audit(src)
    // default the 'src' data in the created inline html field
     hideField.defaultValue = "<script>jQuery(function($){require([], function(){" + src + ";})})</script>"

This entire code considered under beforeLoad section.Since we are creating new field we must consider "N/ui/serverWidget" module,. please go through SuiteScript 2.0 for more details.

Below are the results:

In View Mode:

In Edit Mode:


This code changes works in all browser's, these code changes are not specific to any browser.

Now, We know how to hide the fields with server side script, can we hide the buttons using client side script ?

Answer is Yes, with limitations.

Since the Client Script works in "Edit" mode, the buttons will be hidden in only Edit mode not in View mode.

So, by using UserEvent script will help me to hide buttons in both  View and Edit modes.

Please go through below link for more details. Write to me if any issues, or any better solutions available.

http://blog.prolecto.com/2018/09/22/learn-how-to-hide-netsuite-sublist-buttons-and-other-html-elements/

Thanks,
Ram

Sunday, 9 June 2019

How to Create a Journal Entry in NS using SuiteScript 2.0 ?

What is a journal ?

A journal is a detailed account that records all the financial transactions of a business, to be used for future reconciling of and transfer to other official accounting records, such as the general ledger. 

A journal states the date of a transaction, which accounts were affected, and the amounts, usually in a double-entry bookkeeping method.

How can we create a Journal entry in NS? (Considering Classic Center)
Go to Transactions -> Financial -> Make Journal Entries (click on it).
We must enter credit and debit lines for balancing.
If any situation comes like, to create an automated JE using suiteScript 2.0, below is the way we can do:

var journal = record.create({
    type : record.Type.JOURNAL_ENTRY, (<< you can search for the Enum value in SuiteScript2.0 API provided by NS>>)
    isDynamic : true
    });
   
//set the values in the required fields in JE main section
    journal.setValue('subsidiary',subsidiary);
    journal.setValue('trandate',date);
    journal.setValue('memo',"Creating journal")
   
// Credit line
    journal.selectNewLine('line');
//Set the value for the field in the currently selected line.
    journal.setCurrentSublistValue('line','account',Acct);
    journal.setCurrentSublistValue('line','credit', Amt);
    journal.setCurrentSublistValue('line','memo',"Account Balancing");
    //Commits the currently selected line on a sublist.
journal.commitLine('line');
   
// Debit Line
    journal.selectNewLine('line');
//Set the value for the field in the currently selected line.
    journal.setCurrentSublistValue('line','account',depAcct);
    journal.setCurrentSublistValue('line','debit', checkAmt);
    journal.setCurrentSublistValue('line','memo',"Account Balancing");
//Commits the currently selected line on a sublist.
    journal.commitLine('line');
    //save the record.
    journal.save();

In the above code, we are trying to create a journal entry in dynamic mode.

This should work, in case please let me know.

Thanks